General
The guideline for acquiring an image, which allows for optimal accuracy, is simple yet important. When it comes to the precision of KLONK Image Measurement, the software is accurate down to 1 pixel, so the only constrain is the quality of the image and the precision of the user. Often, the accuracy is equal to the time spend by the user, but not all projects demand the same level of accuracy.
It is not needed to spend excessive amount of time increasing the accuracy if the project only demands a rough estimate. That philosophy is both applicable in the acquiring and measuring of images.
Calibration and placement of ruler
Calibration is the process where the scale of the image is shown to the software. Technically this involves showing how many pixels equal a specific amount of the desired unit chosen. Practically you mark a known length on the image, such as a ruler, and type in the length.
Many different objects can be used to calibrate, a ruler is just an example. All objects with a known size (length, width, height or diagonal) can be used for the calibration. Note that the word ruler is hereafter used to describe the object used to calibrate the image.
This method disregards all variables such as lens angle, zoom and other both camera and environmental specific variables.
All measurements in a specific image will be based on the calibration, so this step is one of the most important steps when assuring accuracy.
The rules for placing the ruler are simple but important:
- Place the ruler in the same level (distance from camera) as the object
- Place the ruler as close to the object as possible
- Do not cover anything which needs measuring with the ruler
- Use a ruler which uses the same units as you want to use with measuring
 Rule 1 – same level
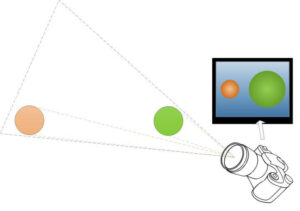
Objects closer to the lens will seem bigger than objects further away from the lens, due to the angle of the lens. The 3D world we live in is converted into a flat 2D image, which gives size distortions. To prevent any miscalculations of size, make sure that the ruler is placed in the same level as the surface you want to measure on.
Rule 2 – as close as possible
To ensure that the ruler is in fact in the same level as the object you want to measure, and that no other variables are interfering with the calibration, place the ruler as close to the object you want to measure as possible. This will also allow for the image to be used as documentation, as the scale is clearly visible for anybody who has access to the image.
Rule 3 – do not cover anything with the ruler
Remember that the important object in the image is what you want to measure, and that the ruler is only for calibration. Make sure that the object you are interested in measuring are in center, focus and not covered by anything.
Rule 4 – use a ruler with the correct unit
If you want to measure with metric units, be sure to use a ruler with metric units. The same goes the other way around, if you want to measure with imperial units, find a ruler with imperial units. To convert between units can be done, but it reduces accuracy, and leaves room for human errors.
 Angle
Angle
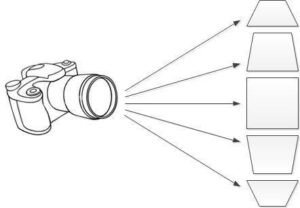
Make sure to aim the camera directly at the object and hold it as close to 90o as possible. If the image is taken in an angle to the surface of the object, it will seem smaller than it actually is.
Distance
To allow maximum accuracy, the distance between the camera and the object should be as short as possible. Too big a distance allows some cameras and lenses to distort the image, especially around the rims.
 Example 1
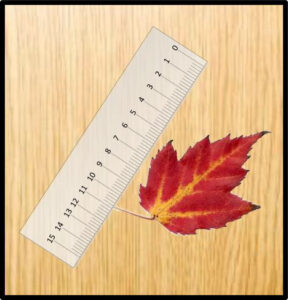
An example of a good image is shown to the right. The ruler is close to the object, it is in the same level and the image is taken in a perpendicular angle.
Procedure:
- Lay the object (in this case a leaf) flat on an even surface, like a table
- Place the calibration object (in this case a ruler) next to the object
- Acquire the image in a perpendicular angle
Example 2
If you need to measure a bigger object, like a house, other methods are more suitable.
Procedure:
- Measure one dimension manually
- Acquire the image in a perpendicular
- Angle
 Digital images
Open an image directly from a location on the computer. Upon clicking ![]() (Add image), a dialogue box will appear. This dialogue box allows you to browse your local hard drive for the image you want to open. Mark the image and press Open.
(Add image), a dialogue box will appear. This dialogue box allows you to browse your local hard drive for the image you want to open. Mark the image and press Open.
Another option is to drag and drop the image into the software. Open Windows Explorer and locate the folder where the image you want to acquire is located. Drag the image into the software. This will automatically import the image.
Formats
The following formats are supported:
- TIFF Bitmap (*.tif;*.tiff;*.fax;*.g3n;*.g3f;*.xif)
- CompuServe Bitmap (*.gif)
- JPEG Bitmap (*.jpg;*.jpeg;*.jpe;*.jif)
- Windows Bitmap (*.bmp;*.dib;*.rle)
- Portable Network Graphics (*.png)
- DICOM Bitmap (*.dcm;*.dic;*.dicom)
- Windows Metafile (*.wmf)
- Enhanced Windows Metafile (*.emf)
- Targa Bitmap (*.tga;*.targa;*.vda;*.icb;*.vst;*.pix)
- JPEG2000 (*.jp2)
- JPEG2000 Code Stream (*.j2k;*.jpc;*.j2c)
- Multipage PCX (*.dcx)
- Camera RAW (*.crw;*.cr2;*.nef;*.raw;*.pef;*.x3f;*.bay;*.orf;*.srf;*.mrw;*.dcr;*.sr2)
- Photoshop PSD (*.psd)
- Vectorial objects (*.iev)
- Layers (*.lyr)
PDF files
PDF files can be imported in the same way as digital images. Upon pressing ![]() (Add image) a dialogue ox appears where you can find the PDF-file you want to add.
(Add image) a dialogue ox appears where you can find the PDF-file you want to add.
Multi-page PDF-files can also be added, each page in the document will be threaded as a separate image. Each page or image will be added to the current course open, and are now available to be measured.
Live video source
It is possible to acquire an image directly from a live video source which supports TWAIN interface. This could be a webcam, digital camera, video camera, microscope etc.
When clicking ![]() (Scan) and clicking Acquire the live video is shown. Here you can either take a snapshot or adjust the preferences or format. In preferences you can adjust color, light, contrast, etc. The control panel is dependent on the type
(Scan) and clicking Acquire the live video is shown. Here you can either take a snapshot or adjust the preferences or format. In preferences you can adjust color, light, contrast, etc. The control panel is dependent on the type
of camera and driver.
If more than one TWAIN source is available, you are able to choose between them by clicking Select Twain Source. This window will display the different TWAIN compatible sources, where you can select one and press OK. The selected camera will now be the default one used.