Manual

How to use the Project explorer

Workspace setup

The workspace consists of a hierarchy of 3, with workspace as the top, followed by object and course. It is a way of grouping the projects into intuitive categories. Each workspace can contain multiple objects, and each object can contain several courses. Each course can have one or more pictures attached, together with a date, and the measurements made here are the basis for the graphs and report generation. This will be elaborated later, now we will focus on the workspace setup.

As an example, workspace could be the department, object the patient and course the individual disease.

After a workspace, object or course has been created, they are available through a drop-down menu.

Three buttons are available: AddEdit and Delete.

Images

The images in the selected course will be shown in the image explorer. When an image is marked, it will show up on the drawing board, ready to be measured or show existing measurements. The image contains information regarding date and a description, which both are altered in the image explorer shown to the right. By clicking the date, a calendar will appear, and a date can be selected. The description is altered by clicking the empty field and text is entered by typing.

Results

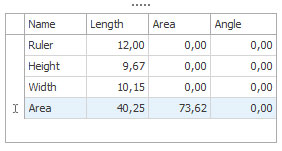
When an image has been selected, the results for that image will be visible in the result overview. To give a better overview, each  measurement can be given a name. When newly created, the measurements will be called figure 1, figure 2, figure 3, etc. By clicking the name, it can be changed to a customized name. In this example, the names AreaHeight and Width are chosen. When an area measurement is made, length refers to circumference and area to surface area.